How to make an animated GIF with Photoshop
GIFs are pretty much an inescapable form of internet communication now, and it’s never been easier to make your own. Giphy’s online GIF maker lets you pull short YouTube clips and add captions, and Giphy Capture is a great Mac app that lets you drag the part of the screen you want to record and turn it into a neat animation. But if you want to stand out from the crowd by making your own animated GIF in Photoshop, here’s how.
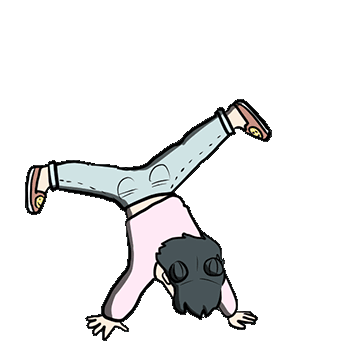
For the purposes of this demonstration, save this GIF to your computer and open it in Photoshop. We’re going use the individual frames of this GIF as a guide to draw a version of yourself breakdancing. It’s a little bit like rotoscoping, a technique used by animators to trace over live-action footage, but instead, we’re just tracing over the general body outline in our original GIF. I chose to make my new GIF a breakdancing bear, to get a result like this:
:format(webp):no_upscale()/cdn.vox-cdn.com/uploads/chorus_asset/file/13250843/breakdancing_together.jpg)
Opening up your GIF in Photoshop should open up the timeline panel, which will look like this:
:format(webp):no_upscale()/cdn.vox-cdn.com/uploads/chorus_asset/file/13250879/Screen_Shot_2018_10_10_at_5.43.13_PM.png)
In your layers panel, create a new layer and place it on top of layer 1. Lower the opacity for layer 1 so you can use it as a guide to draw another layer on top. Do this for each of the five layers. It should look something like this:
:format(webp):no_upscale()/cdn.vox-cdn.com/uploads/chorus_asset/file/13250883/Screen_Shot_2018_10_10_at_5.20.07_PM.png)
Once you have your five new layers drawn, go ahead and delete the original five layers to clean up your workspace. Moving back to the timeline, click each frame and set it so that only one corresponding layer is visible at a time, by clicking on the eye icon. Click the play button, or hit the spacebar to test out your animation.
You can adjust the speed of your animation by clicking on the 0.2 below the thumbnail, which will open up a menu of how long each frame will be shown on screen.
:format(webp):no_upscale()/cdn.vox-cdn.com/uploads/chorus_asset/file/13250909/Screen_Shot_2018_10_10_at_5.49.47_PM.png)
When you’re happy with the speed of your animation, it’s time to save your GIF! Go to File —> Export —> Save for Web. Make sure the looping options are set to “Forever,” in both the timeline and on the export screen. Also, keep in mind the file size limitations of the social platforms you’re planning on sharing it to. A good rule of thumb is to keep files under 5MB, so they can be shared anywhere. Good luck!
https://www.theverge.com/2018/10/11/17952802/how-to-make-gif-photoshop-timeline-animation
Tidak ada komentar